Learn
We have included many feature how-to articles and introduction videos below.
Introduction
Food Pantry Helper Introduction Overview
This 2 minute video will give you an introduction overview of Food Pantry Helper.
Clients / Households and Pickups Features
Clients / HH Members / Pickups Tracking
This 4 minute video will show you how to add clients, household members and log a food pickup.
Clients/HouseHolds Data Import
This 4 minute video will show you how to import client data into Food Pantry Helper.
Client Pickups Using a Barcode (Premium or Plus Plan required)
This 2 minute video will show you how to use Client Pickups / Barcode of Food Pantry Helper.
This feature requires you have a Barcode Reader that reads PDF417 codes. The Barcode reader just acts as a keyboard.
Spaces or special characters in client first/last names will interfere with barcode operation.
Client Pickups using Kiosk Mode (Premium or Premium AI Plan Required)
This 2 minute video will show you how to use Client Kiosk Mode of Food Pantry Helper.
This feature requires you have a Barcode Reader that reads PDF417 & UPC codes. The Barcode reader just acts as a keyboard.
Spaces or special characters in client first/last names will interfere with Barcode operation.
Client Kiosk Mode Barcode Scanning (Premium or Premium AI Plan Required)
This feature lets a Client scan in and then scan items for pickup.
- Requires Barcode Scanner to read PDF417 codes (for Client Identification).
- Requires Barcode Scanner to read UPC codes (for Item Identification).
- Spaces or special characters in client first/last names will interfere with Barcode operation.
Client PreOrder Items (Premium Plan and Shopping Cart option required)
This 2 minute video will show you how to use Client PreOrder Items (Shopping Cart) of Food Pantry Helper.
Client PreSchedule a Pickup (Premium or Plus Plan required)
This 2 minute video will show you how to use Client PreSchedule a Pickup of Food Pantry Helper.
Client PreSchedule a Pickup (Premium or Plus Plan required)
- When logged in as your Admin Account (and you need Plus or Premium Plan), goto upper right corner and Click on UserName, then choose "Manage Locations / Warehouses". Add at least one location and check "Is Pickup Location".
- When logged in as your Admin Account (and you need Plus or Premium Plan), goto upper right corner and Click on UserName, then choose "Manage Pantry Schedule". Set up Days / Times when you allow Client to Preschedule. All Fields must be filled in.
- Give Client a PIN (within client screen). You also need to fill in Client email and home phone number. A passcode is sent to Client via email when they log in.
-
Let Client know they need to goto https://www.foodpantryhelper.com/clientservices. The Client will need to enter their LastName, last 4 home phone and their PIN.
Client will get an email (they should check their spam box just in case). Then they will come to a screen where they can pick the date/time they want to come in. - The Admin can see all the Preschedules by going to REPORTS section - "At A Glance Reports". Or you may also choose "Preschedule Pickups / PreOrders" in the REPORTs screen.
Client Pickup Barcode Scanning (Premium or Plus Plan required)
- To create a Client Barcode. In Client section, click "Scan" to the right of a Client.
- This will produce a BarCode image (PDF417 type barcode) that you can download (right mouse click) and use on a tag.
- The Barcode reader must be configured to act as a keyboard.
- Click the link "Client Pickup Scan" on the bottom of Clients Section.
- You can then scan the Client's Barcode and the system will bring you to that Client's pickup screen.
- The Barcode reader must be configured to act as a keyboard.
- Spaces or special characters in client first/last client names will interfere with Barcode operation.
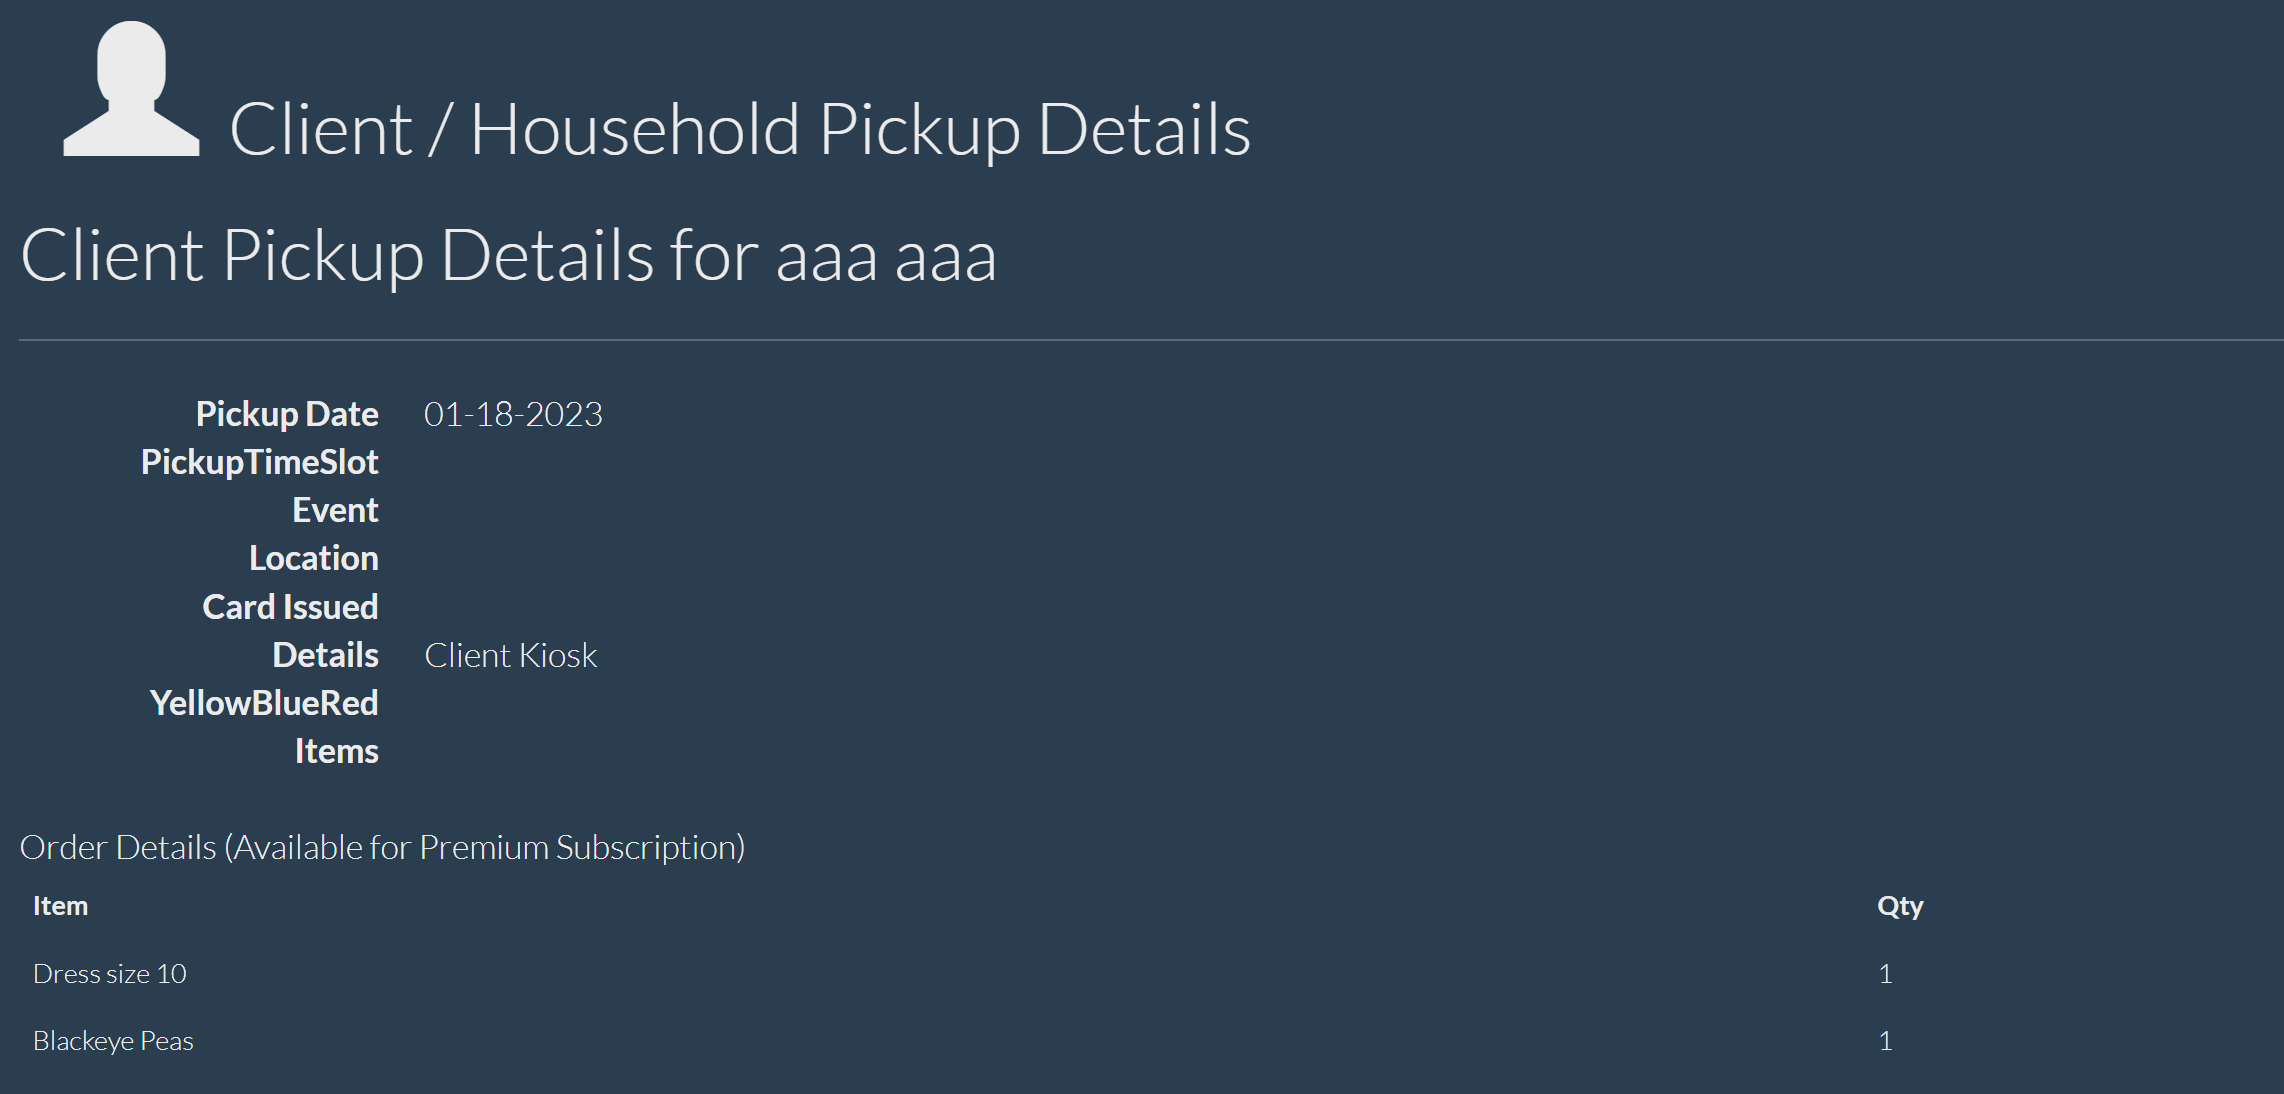
Client Pickup and Item Tracking (Premium or Premium AI Plan Required)
This 2 minute video will show you how to use Client Pickup and Item Tracking of Food Pantry Helper.
Client Pickups and Item Tracking (Premium or Premium AI Plan Required)
Client Pickups Item Tracking lets you add a pickup and log what inventory items were given out.
You may log by Quantity and/or by Weight.
- Goto "Client HouseHolds" section, then choose "Pickups" - "Create New Pickup" - "Create Pickup and Track Items".
- Scan a UPC code or start typing into the "Search" text box (which will list items that meet your criteria in your inventory) and then pick an item from the "Results Dropdown".
- The item you choose will populate to the "Item Title" text box, then you may either a QTY or Weight (in lbs. fractions are okay). Although you can, we DO NOT recommend using both qty and weight for the same item as that will reduce inventory by both qty and weight for that item. Our recommendation is for you to use either qty or weight. As an example, if you give out a 1.5lbs. of apples, you should log it as 1.5 within the weight field.
- To make a change, you may delete the item and re-enter it. Click "Add Item to List" to add item to Pickup Items List.
- When done, click "Complete Pickup Items List". Once "Complete Pickup Items List" is clicked, your Pickup and Items have been fully logged.
- To start over, you may click "Stop and Start Over".
Client Pickup and Issue Gift Card (Gift, Milk, Item, Money Card) (Premium Plan required)
This feature lets a Client Pickup indicate a Card was issued during the pickup.
- Step 1. Goto upper right, click on your username. Choose Manage Categories.
- Step 2. Add a category with the term "Card" in it. "Milk Card", "Gift Card", "Money Card".
- Step 3. Goto Inventory section and click on bottom link, "Create Card".
- Step 4. Choose one of the Card categories and enter in other required fields. We suggest you give Title as something descriptive such as "Gift Card - $100"
- Step 5. On Pickup, you will now see that Card choice next to "Card Issued".
- Step 6. Proceed with Pickup input as you normally would.
- To export the data. You may use Export feature on Clients section, "Export Clients Pickups To Excel - Last 180 Days". Advanced Reporting will also show this data in Reports section.
Importing Client Data from another DataBase
This feature will allow you to paste your comma delimited Client contact data into Food Pantry Helper.
- Max of 200 imports at one time.
- Household family members will not be imported. Only main household client. You may manually add HH members after import is complete.
- Format of data must be (15 fields): ClientFirstName (100 char max),ClientMiddleName (50 char max),ClientLastName (100 char max),Address (100 char max),Address2 (50 char max),City (100 char max),State (25 char max),Zip (5 char max. digits only),Phone (20 char max. digits/dashes),Cell (20 char max. digits/dashes.),Email (50 char max),BirthDate (mm-dd-YYYY),DateBecameClient (mm-dd-YYYY),Notes (200 char max),HouseHoldIncome (whole number, no decimals).
- Blank fields are okay for Phone, Cell, Birthdate (defaults to current date if blank), DateBecameClient (defaults to current date if blank), Notes and HouseHoldIncome. But you must still have a comma so we detect the field.
- Within the data, do not use special characters, commas or periods. "!'#$%^&*(),. are NOT accepted.
- Please ensure your data is clean, accurate and without duplicates. This procedure imports without checking for duplicates.
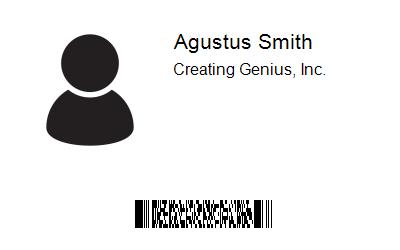
Client ID Badge Creation (Premium Plan required)
Creates an id badge image that you can paste into your badge creation system.
-
A Profile Picture must exist for the Client. (last profile pic uploaded is used)
Go to Clients / Housholds section, choose Client and click "Files".
Use "Choose File" to upload a file and use the "File Type" dropdown and choose Profile Picture.
Then press "Upload File". -
Then go back to client list and choose "ID/Barcode".
Your badge will show. You can right mouse click, save image and use within you badge printing system. Then use you own Badge printing system to create the badge. We do not provide the badge printing system. We just provide the image that you can use within your badge printing system. - Spaces or special characters in first / last client names will interfere with barcode creation.
- Re-Create this Client's Barcode feature is available on this page. Use this feature ONLY if barcode scan for this client is not working and client's first or last name was changed since previous barcode was created.
Inventory Tracking Features
Inventory Tracking
This 2 minute video will show you how to use the Inventory Tracking feature.
Grant Tracking Features
Grant Tracking
This 2 minute video will show you how to use the Grant Tracking feature.
Staff and Volunteer Features
Staff/Volunteer Tracking And Scheduler
This 2 minute video will show you how to use the Staff / Volunteer Scheduler.
Donation and Donors Features
Food Pantry Helper How To Use Donor Tracking
This 2 minute video will show you how to use Donor section of Food Pantry Helper.
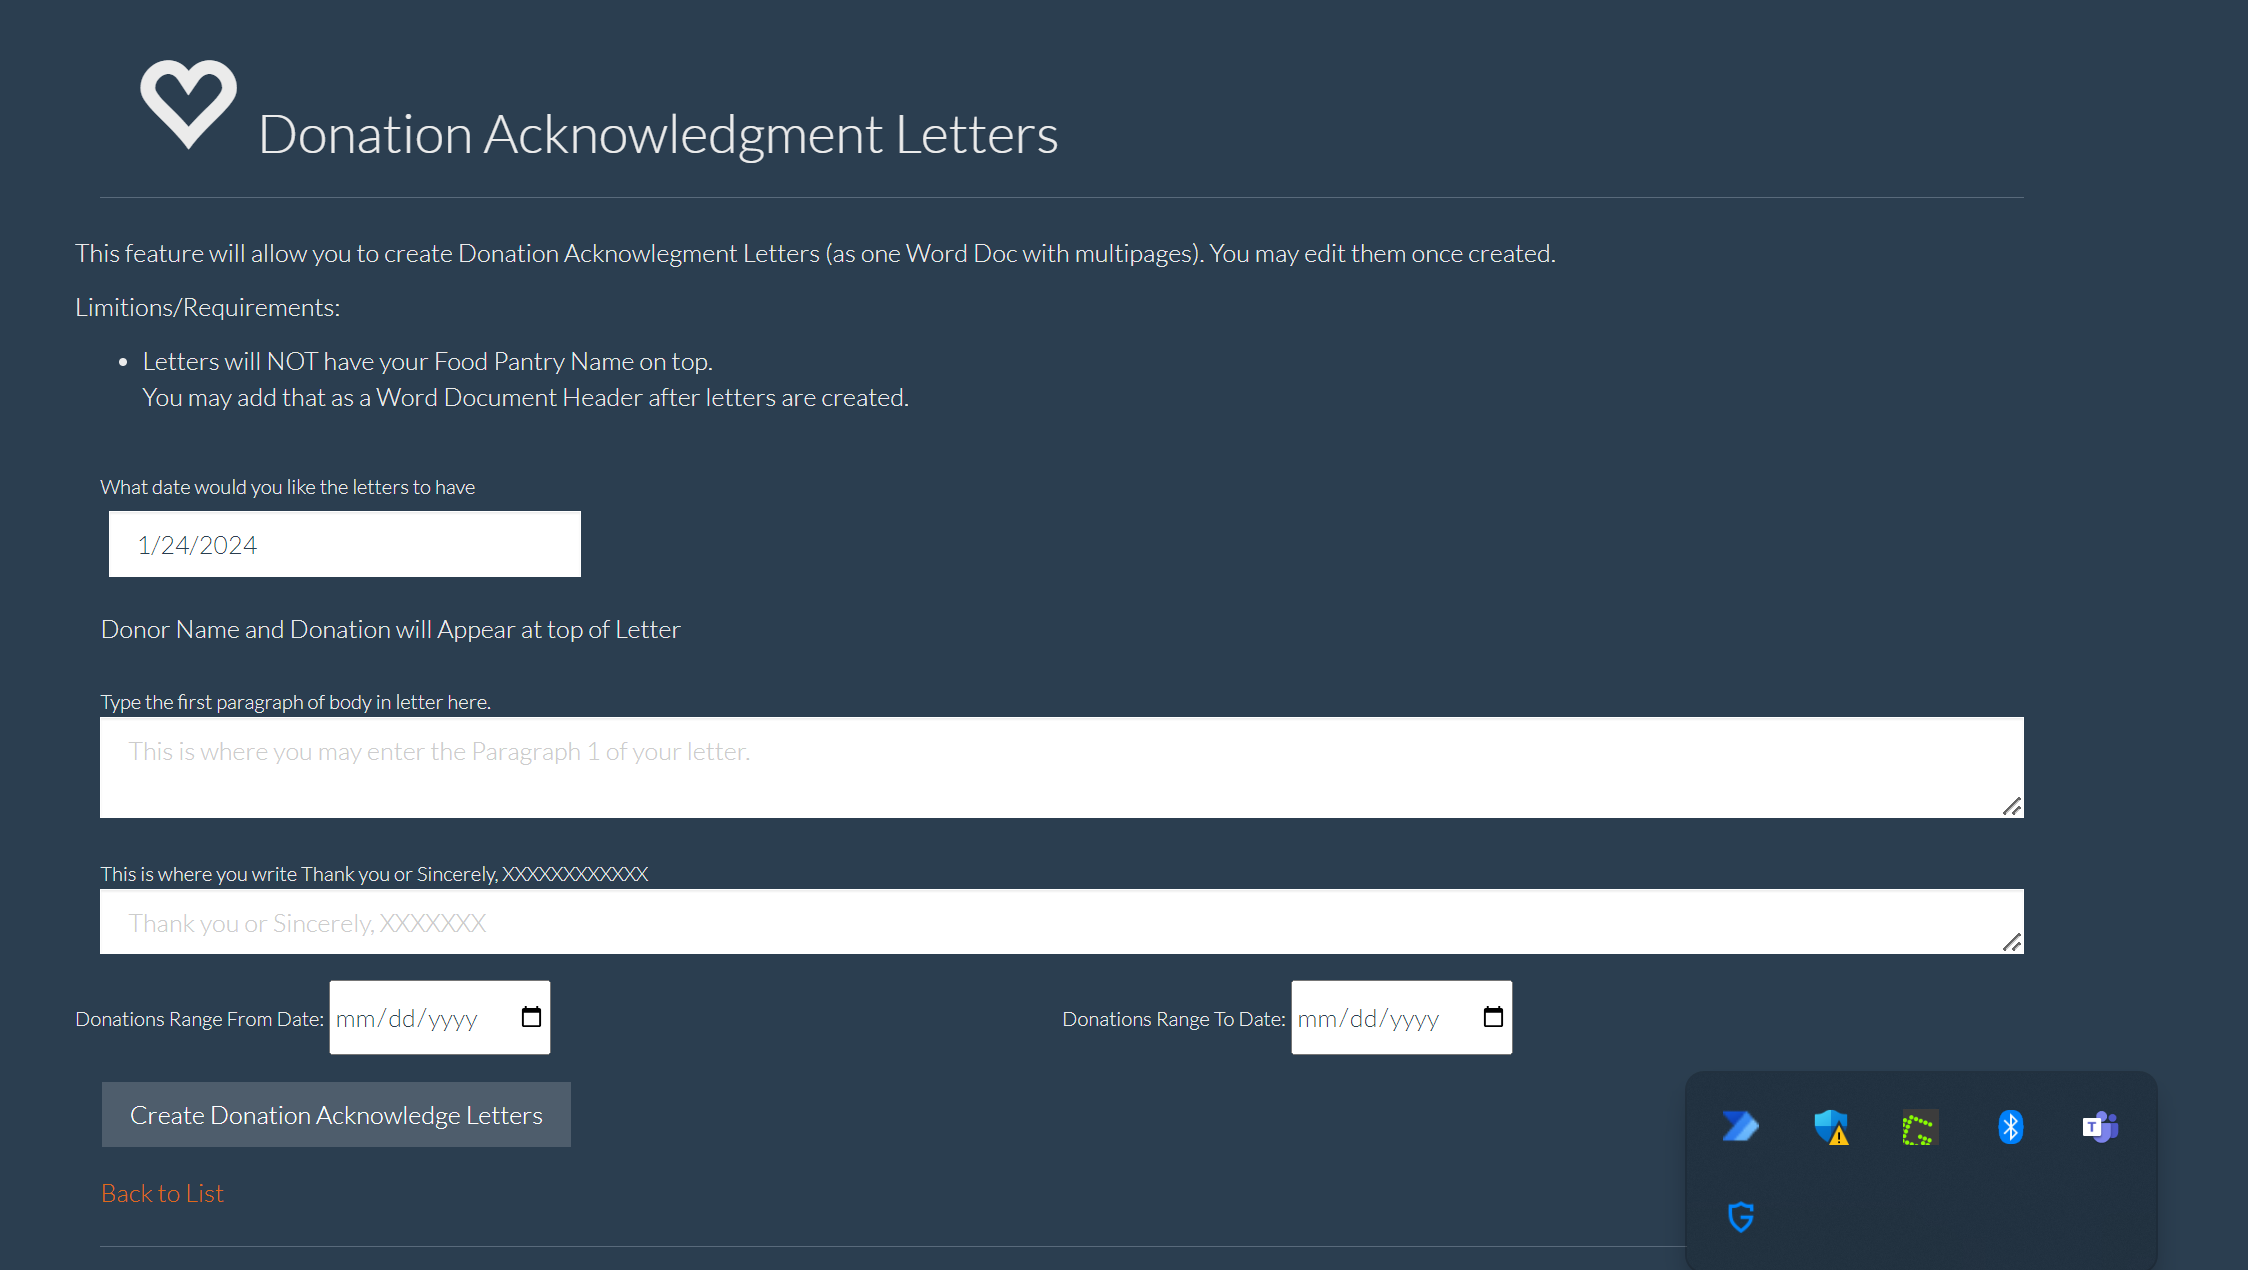
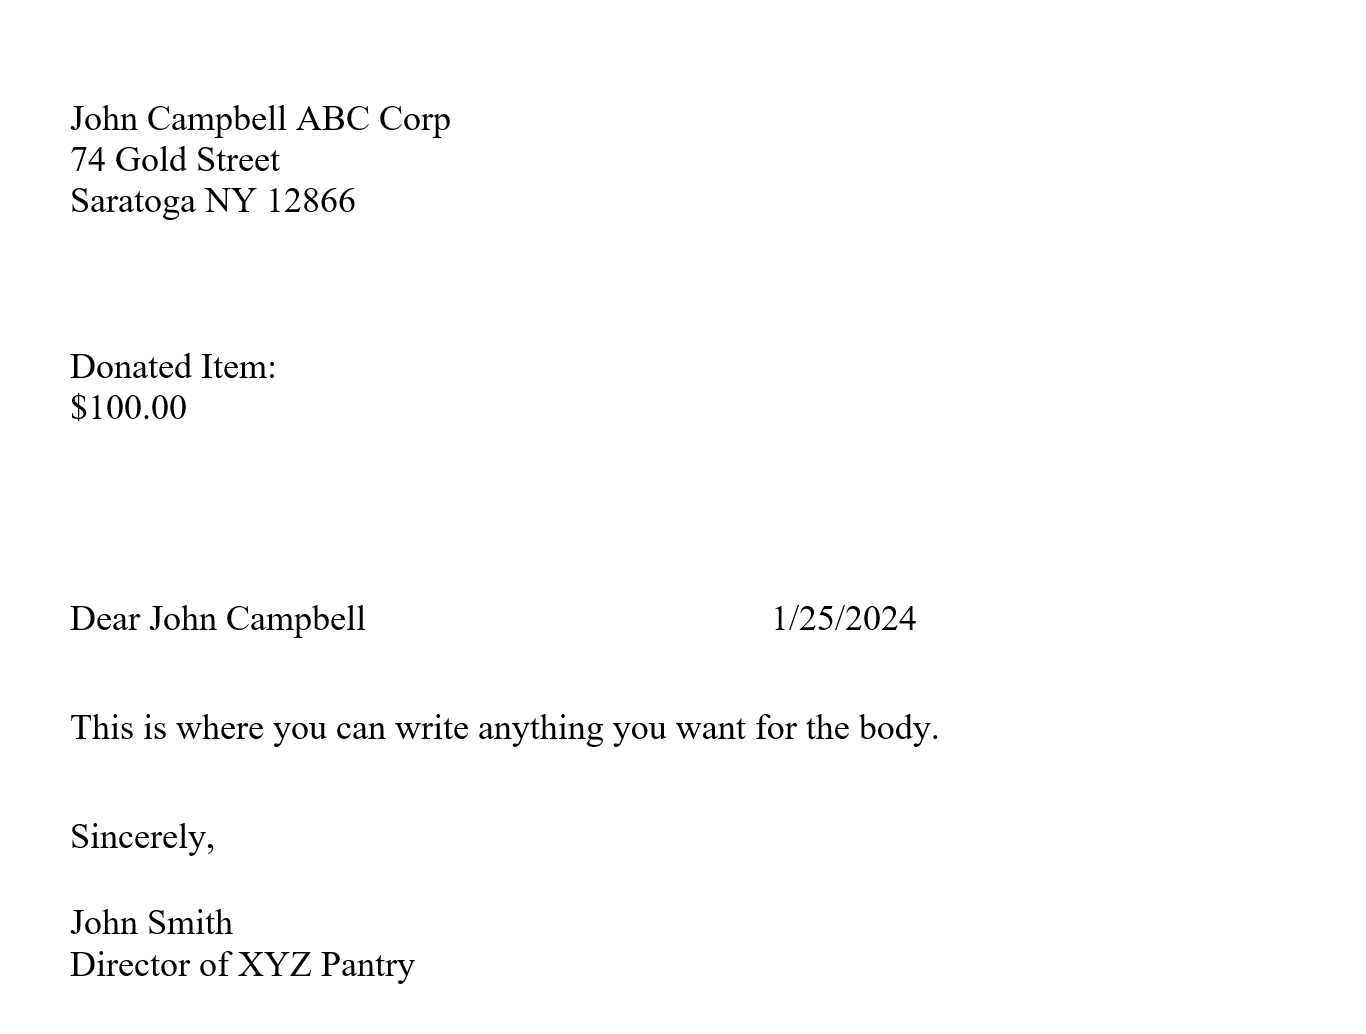
Donation Acknowledgment Letters. (Premium Plan and Donation Letter Option required)
The system can auto create a word document with a simple Donation thank you letter for each of your recent donations.
You can edit the word document locally.
Food Pantry Helper How To Use Donation Acknowledgment Letters with AI. (Premium AI Plan)
You get all the features of Donation Acknowledgment Letters plus the added feature of Generative AI writing the letter for you and mentioning an event if preferred.
Reporting Features
Reports
This 2 minute video will show you how to use Reports section of Food Pantry Helper.
Reports (Filtered by Date Range)
Reports let you see activity and client data. (word and excel may be required)
- Dashboard shows HouseHolds served
- New Clients
- Donations
- Executive Summary (word document) shows you households served broken down by age groups and veterans, Donations and Grants received, and allows you to enter/edit document for your own organizations purposes.
- Households Served Report (word document) shows of summary of clients served
- Manage Userid Account/change password
- Client Pickups (excel) shows a list of clients served
- Pickups by Zipcode
- Pickups by Gender
- Pickups (count once per month no matter how many times a client did a pickup that month)
- Advanced Reporting feature - allows basic filter and sorting of your data.
Backpack Features
Food Pantry Helper How To Use Back Pack Program Features
This 3 minute video will show you how to use the Back Pack Program Features of Food Pantry Helper.
Administration and Security Features
Settings/Security Functions you can perform as Primary Account
Administration Functions (Click on Username - upper right corner)
- Add/Edit Administration Message (Welcome Message)
- Edit Client Pickup Bag Default setting
- Edit Client Pickup Default Event setting
- Set Pickup Limits (set warning limit if too many pickups are made in the month)
- Manage Inventory Categorgies (for Plus/Prem Plan Accounts Only)
- Manage Locations (for Plus/Prem Plan Accounts Only)
- Manage Userid Account/change password
- Manage Secondary Accounts (add/edit secondary user accounts)
- Pay or renew account plan
- View previous account payments
- Enable BackPack Program Features
- See User Activity Logs
- Manage Contact Web Page Settings
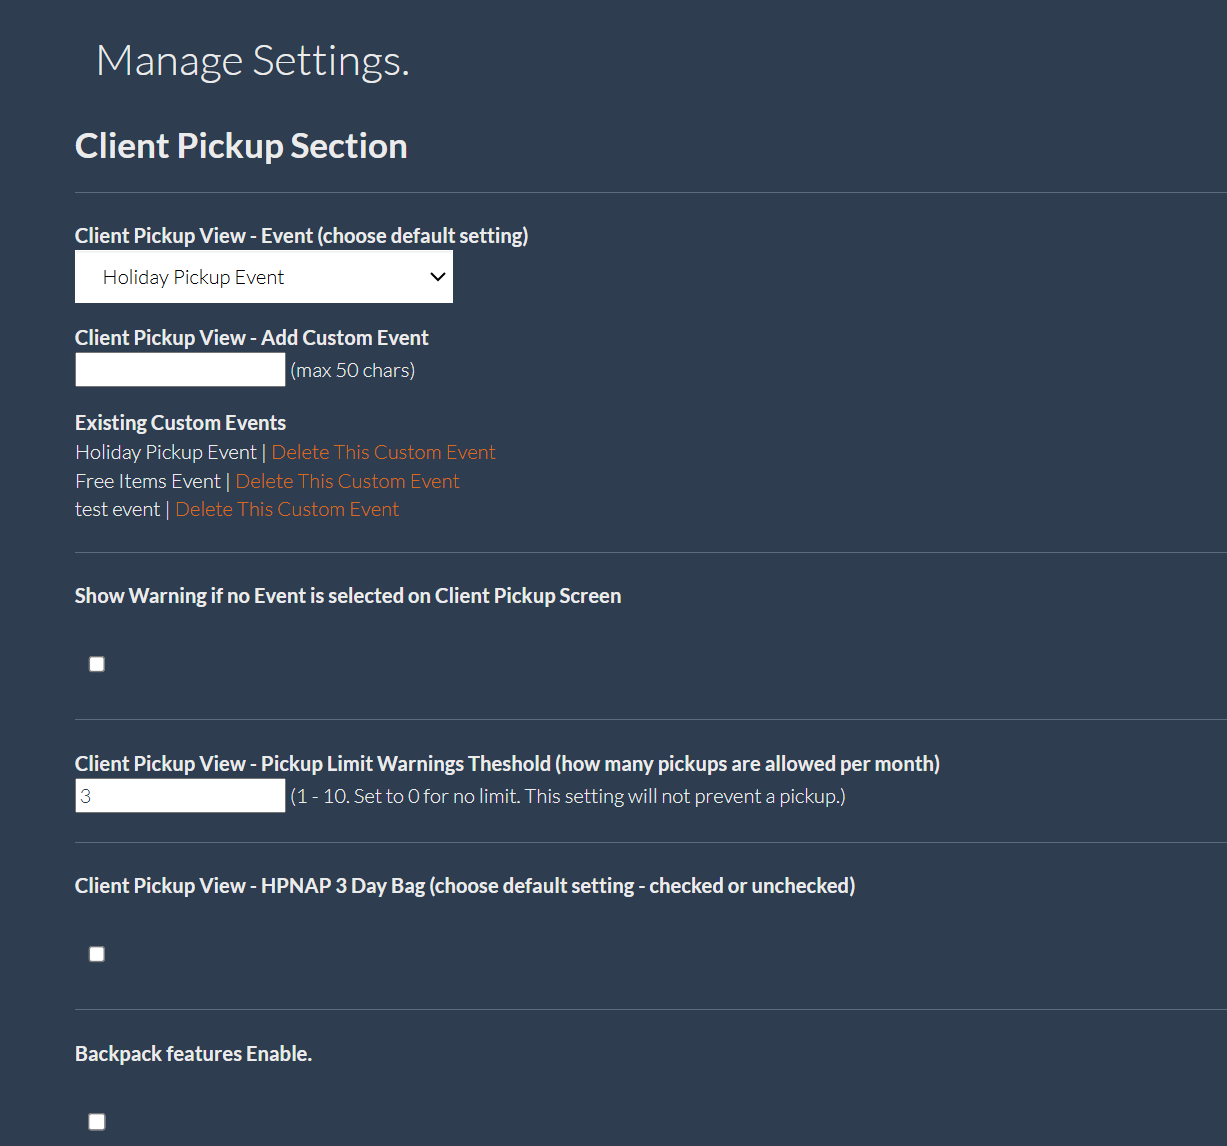
Manage Settings screen example
How to configure Two Factor Authentication (2FA)
- When configuring 2FA.
- When logging in for first time after configuring 2FA.
- When someone with a different user account logged into the same machine before you.
- When using a different PC/Browser than the previous login.
- When 30 days have expired since entering the last code.
- When possible suspicious login is detected.
- When browser prevents cookies from being saved.
Step 1. Log in as your primary account (this is the account you used when first setting up Food Pantry Helper.
Step 2. Click on Username (on upper right corner of screen)
Step 3. Choose "Manage Primary Account".
Step 4. Choose communication method (either email or text), then enter in your email or cell phone # (Account gets only ONE email or phone #). Click "Set Two Factor Authentication" button.
Step 5. For verification, you will recieve a code, enter in that code and click "Confirm".
You have completed the 2FA setup for primary account.
Step 1. Log in as your primary account (this is the account you used when first setting up Food Pantry Helper.
Step 2. Click on Username (on upper right corner of screen)
Step 3. Choose "Manage Secondary Account".
Step 4. Choose which secondary account you want to edit and click "Manage 2FA" .
Step 5. Choose communication method (either email or text), then enter in your email or cell phone # (Account gets only ONE email or phone #). Click "Set Two Factor Authentication" button.
Step 6. For verification, you will receive a code, enter in that code and click "Confirm".
You have completed the 2FA setup for secondary account.
How to add/edit secondary user accounts
Secondary accounts allow you to restrict what features within Food Pantry Helper the user can access.
Each user must be issed their own UserID and Password. (account sharing is prohibited).
You can acquire more secondary accounts via "Pay for Add-Ons" within the Admin dropdown.
- Standard Plan: 1 secondary account.
- Plus Plan: 4 secondary accounts.
- Premium Plan: 19 secondary accounts.
Step 1. Log in as your primary account (this is the account you used when first setting up Food Pantry Helper).
Step 2. Click on Username (on upper right corner of screen)
Step 3. Choose "Manage Secondary Accounts".
Step 4. Click "Create New Account".
Step 5. Add the UserID and Password for that user. The UserID must be a working email address.
Step 6. Click the checkbox for what features you want this user to have access to.
Step 7. Click "Create Secondary User" button.
Step 8. Choose 2FA communication method. Either by email or by sms.
step 9. Click "Set Two factor Authenication" button.
Step 10. 2FA will send a confirmation message to the sms or email you entered for 2FA method. You must enter that code and click "Confirm".
How to use Primary / Sub Organizations (Premium Plan and Optional Add-On required)
This feature will allow you to have a primary organization and also your manage sub organizations.
- A Sub Organization acts as its own entity with oversight from the primary organization.
- Primary account can manage "Act As" any of the Sub Organizations. Use the "Manage Sub Organizations" link in Admin dropdown and then choose what Organization you want to manage.
- Once logged in as a sub organization, you will see all data and can do all functions for that organization.
- You will need to log off to go back to Primary account.
- Two Organization reports which give you data for all organizations are included in the Reports section: Client Export and Client Pickups Export.
- Reports have a 6 month date range max.
How to send Texts (SMS) (SMS Option required)
Limitations/Details: (Use "Pay For Add-Ons" menu choice in upper right to buy SMS Message credits.)
- One credit used per sent message. One credit used per "Opt In Ask" (Permission Ask).
- SMS message comes from a dedicated Food Pantry Helper SMS tele number (not from your cell number).
- Texts can only be sent to US Cell Numbers.
- Texts will take time to reach receiving number. Can be a few minutes or a few hours.
- SMS Message credits can be used within your subscription year. They do not rollover.
Requirements: We provide the Opt-In and Tracking system to ensure only people who gave permission will receive texts.
- The person receiving the text will be REQUIRED to grant permission (Opt In) prior to receiving texts.
-
A One-Time "Opt In" (Ask for Permission) SMS message must be sent to any Client you want on your SMS List. They can answer Yes (Agree) or Stop.
You will be charged with one credit for this permission request.
Charges are incurred whether person agrees or disagees. We will provide this ability and track who agreed.
Receivers don't need to be asked again once they are on the permission list. -
"Telephone Consumer Protection Act (TCPA)" are the governing laws for text and phone communication and are very strict.
see Telephone Consumer Protection Act (TCPA) ->
Changing the email address (username) on the primary account.
You also must be authorized by your organization to create the account on their behalf.
Personal email addresses are not allowed and in violation of our terms of service.
We understand that certain circumstances may require the need to change your primary email address.
The requirements for an account change are as below (but not limited to):
- We get an email from the current primary account explicitly stating approval to switch to a new account.
- The new account email must belong to the organization and not be a personal email address.
- A switchover fee is paid to cover our adminstration and technical costs.
- Other actions may need to be taken depending on the nature of account switch.
Premium AI Features
How to let a potential Client to self register (Premium AI Plan required)
Limited to 10 new self registrations per day. May be expanded in the future.
Limited to basic identifying fields. You may edit their data upon activation.
- Give potential Clients your 5 digit "Pantry ID" located on your main screen upon log in.
-
Direct potential client to Client registration link.
https://www.foodpantryhelper.com/ClientServices/CreateClientAccount -
They are required to enter their email address (they will receive a security code) and the "Pantry ID".
They will be redirected to start again upon entering incorrect information. -
The next screen will ask for their basic information.
First name, last name, address, email and cell number.
Plus the security code they received via email.
They will be redirected to start again upon entering incorrect information. -
Upon completion, the client will show in your "InActive Clients" list.
These clients will show last name bolded and have "Client Self Registration" in notes field. You can decide to make them active at that time and edit/add to their data.
How to use AI inventory projections (Premium AI Plan required)
This report needs past three months of history data from inventory usage via client kiosk or shopping cart.
-
Go to reports section and choose "Inventory Needs Projections AI - CSV"
This report gives you the next three months projections for each of your most used items.
How to use Client creation via driver license upload with AI (Premium AI Plan required)
This feature lets you create a new client by uploading an image of their drivers license.
This feature extracts data such as first name, last name, address and birthdate from driver license and starts the process of creating a new client.
-
Go to clients / households section and "Create Client from Driver License Image" link on bottom of page.
- Use "Choose File" to upload a file and use the "File Type" dropdown and choose Driver License. Then press "Upload File". You will be redirected to Client Create screen with basic fields prefilled.